
1. Why the Renovation Window Is the Most Important Security Decision You Will Make
A renovation is not just an opportunity to upgrade your security system. It is the only time you can plan it properly: with full access to wall cavities, ceiling voids, and conduit routes that will be permanently sealed once the plastering is done. Miss this window and you will spend significantly more to get significantly less.

An open wall during renovation: conduit and cables can be run anywhere at minimal cost. Once plastered, every additional cable run requires opening the wall again.
Every security decision made during a renovation is either free or very cheap. Running a Cat 6 cable to a camera position costs a few dollars in materials and minutes of labour when the wall is open. Running the same cable through a completed wall: chasing plaster, patching, repainting: costs S$150–300 per run, minimum, and leaves a visible scar on a freshly finished interior. Running conduit during the build costs almost nothing. Pulling new cable through a conduit two years later is simple. Pulling new cable through a wall with no conduit means opening the wall.
The mathematics are clear. The problem is that most homeowners engage their security contractor after the renovation is complete: because it feels like the logical sequence. Finish the house first, then secure it. In practice, this sequence guarantees a worse outcome at higher cost.
Engage your security integrator before your interior designer finalises the plans. Not before you sign the renovation contract. Before the plans are finalised. That is the moment when camera positions, cable routes, and lock types cost nothing to change. After that moment, every change has a price.
What "Before the Walls Close" Actually Means
In a Singapore landed home renovation, the sequence typically runs: structural works → M&E rough-in (electrical, plumbing, low-voltage) → wall boarding and plastering → tiling and flooring → carpentry and finishing. The security integrator needs to be involved at the M&E rough-in stage: when the electrician is already on site running conduit and cabling. This is when security cabling is added to the same conduit runs at almost no incremental cost. After plastering begins, that window is closed.
Security Planning Is Not About Buying Equipment
Many homeowners assume that security planning starts with choosing equipment: which camera to buy, which alarm system is best, whether to use a video or audio intercom. These are reasonable questions. They are also usually asked too early.
During a renovation, the most important decisions are not about equipment. They are about infrastructure. Where should cameras be positioned? Where should conduit be installed? Where will the network cabinet be located? How will cables move between floors? How will power reach the gate post? These decisions determine what is possible for the next 15 to 20 years of that building's life. Most equipment can be upgraded later: replacing a camera is straightforward. Adding a new cable after the walls have been plastered is not.
The purpose of security planning during renovation is not to decide what equipment to install immediately. The purpose is to ensure the building is ready for whatever security systems may be needed in the future. Infrastructure first. Equipment later.
2. Who to Engage and When
A renovation involves multiple contractors whose work overlaps and affects each other. The security integrator is the party most commonly brought in too late: after decisions have already been made that constrain what is possible.
The security integrator should be engaged at the same stage as the M&E contractor: not after the renovation is complete.
The Contractor Sequence
A Singapore landed home or commercial renovation typically follows a set sequence of trades. The security integrator needs to be present at the right stage: too early and decisions cannot yet be made, too late and the opportunity is lost. The table below shows where each stage falls and what the security integrator's role is at each point.
| Stage | Who Is Involved | Security Integrator Role |
|---|---|---|
| Design phase | Architect / ID finalising floor plans and elevation drawings | Walk the property, advise on camera positions, access point locations, and lock types before plans are finalised. Changes at this stage cost nothing. |
| M&E rough-in | Licensed electrical worker, M&E contractor | Specify all conduit routes, cable types, and termination points. Coordinate to ensure security cabling is included in the same conduit runs as electrical. This is the critical stage. |
| Wall boarding / plastering | Plasterers, tilers | All cabling must be in the walls before this stage begins. Final check that all conduit ends are accessible and labelled before sealing. |
| Carpentry and fitting | Carpenters, cabinet makers | Confirm equipment locations: NVR cabinet, alarm panel enclosure, network rack: are incorporated into carpentry scope before fabrication begins. |
| Completion | All contractors | Install equipment, terminate cables, configure and commission all systems, handover documentation. |
The Interior Designer's Role
Your interior designer controls the visual decisions that affect security: where cameras are positioned relative to architectural features, whether cable trunking is concealed or surface-run, where keypads and readers are located in a joinery design. Brief your ID on the security requirements early so they can design around them. An ID who is not told about a camera position will design a false ceiling that obstructs the field of view. An ID who is not told about an intercom monitor location will panel over the wall where it was supposed to go.
The Electrician's Scope: and Its Limits
The licensed electrical worker (LEW) on your renovation is qualified to run power cables and conduit. They are generally not qualified to specify camera positions, sensor zones, or access control architecture. Do not ask your electrician to decide where the CCTV cables go: they will route them where it is easiest to pull cable, not where the cameras need to be. The security integrator provides the cable schedule and conduit plan. The electrician executes it. These are distinct roles.
Many homeowners assume that because the electrician is already running cables, they can also decide where security devices should be located. This conflates two different skill sets. The electrician's job is to install the infrastructure. The security integrator's job is to determine what infrastructure is required and where it should go. The best results come when both parties work together during the planning stage: not when one is left to make decisions that belong to the other.
3. Planning Your CCTV System Before the Walls Close
CCTV planning during a renovation is about deciding where cameras need to be to achieve the coverage you require: and then running the infrastructure to support that decision before the opportunity is sealed inside the walls.

Cat 6 conduit runs for CCTV positions installed during the M&E rough-in stage: before plastering, these routes cost almost nothing to change.
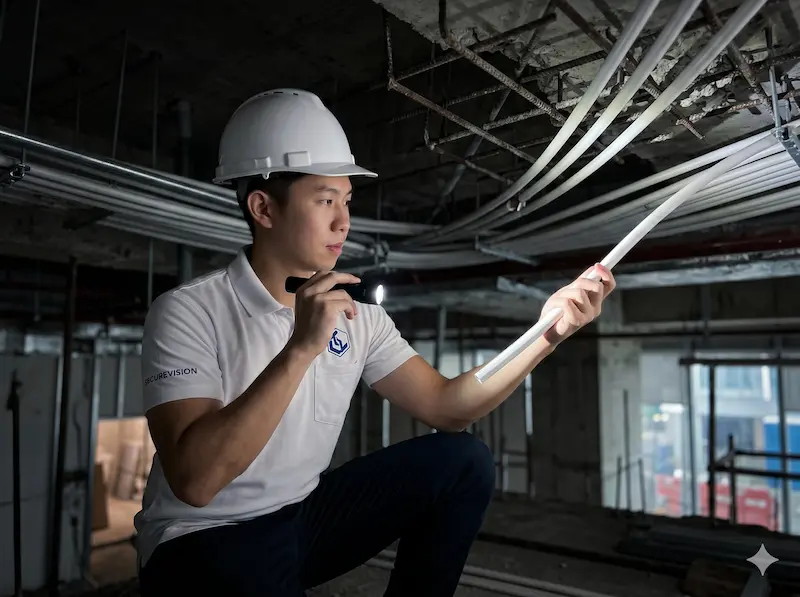
Camera Position Planning
Camera positions should be determined by coverage requirements, not by where it is convenient to run a cable. The security integrator walks the property: ideally with the floor plan: and marks the positions that achieve complete coverage of all entry and exit points, vehicle access, and any high-value areas. These positions are then used to calculate the conduit routes back to the NVR location.
Standard positions for a Singapore landed home: main gate and pedestrian entrance, main door, all ground-floor windows and secondary doors, driveway, garden perimeter, and any external storage areas. Internal cameras are optional but recommended for common staircases and the main living area if the property has live-in domestic staff or regular contractor access.
What to Include in the M&E Schedule for CCTV
- Cat 6 cable from each camera position to the NVR location: specify number of runs and route
- 20mm conduit at each camera position with a 300mm tail protruding from the wall or ceiling
- Power point at the NVR location (dedicated 13A socket, not shared with other equipment)
- Power point at each external camera position if cameras will not be PoE-powered from the NVR
- Wall-mounting backing plate or plywood backing at each camera position to provide a solid fixing surface
NVR Location Planning
The NVR (Network Video Recorder) is the central storage device for all camera footage. It should be located in a secure, ventilated, and accessible space: a dedicated cabinet in the utility room, the master bedroom wardrobe, or a purpose-built comms cabinet. It should not be in a visible location where a burglar would find it immediately, and it should not be in a location with poor ventilation where heat buildup will shorten its lifespan. All camera cables terminate at this location: plan conduit routes from every camera position back to here before walls are closed.
We regularly visit completed renovations where the ID has designed a beautiful false ceiling that sits directly in front of where the driveway camera needs to be: obstructing the field of view entirely. The homeowner now has two options: cut a hole in the new false ceiling, or accept a camera position that does not cover what it was meant to cover. A 30-minute conversation with the ID before the ceiling design was finalised would have prevented both outcomes.
4. Planning Your Alarm System
The renovation vs post-renovation decision for alarm systems is more consequential than for any other security system. A wired alarm system installed during renovation is superior in every measurable way to a wireless system installed after: and costs less to run over its lifetime. But it requires planning before the walls close.

Door and window sensor cables installed in door frames during renovation: once the frames are fitted and painted, adding wired sensors means opening the frame.
Wired vs Wireless: The Renovation Decision
A wired alarm system connects every sensor and keypad back to the control panel via physical cable. Installed during renovation when walls are open, the cables are completely concealed: no visible wiring, no surface trunking, no sensors that look like afterthoughts on door frames. The sensors themselves have no batteries to replace and no radio signal to be affected by interference. A properly installed wired system is the most reliable and lowest-maintenance option available.
A wireless alarm system is the correct choice when a renovation is already complete and opening walls is not practical. It is a compromise necessitated by circumstances: not a preferred architecture. If you are renovating, choose wired.
What to Include in the M&E Schedule for Alarm
- 2-core alarm cable from each door and window sensor position to the alarm panel location
- 4-core cable from each PIR motion detector position to the alarm panel
- 4-core cable from each keypad position to the alarm panel
- 2-core cable from the external siren/strobe position to the alarm panel
- 2-core cable from the internal siren position to the alarm panel
- Conduit at all sensor positions: particularly in door frames where cables are most vulnerable to pinching
- Power point at the alarm panel location for the panel's mains supply
Alarm Panel Location
The alarm control panel should be in a location that is secure (not visible from outside, not in a high-traffic area), accessible for servicing, and close enough to a power supply. A common choice in Singapore landed homes is inside a wardrobe or utility cupboard near the main entrance. The keypad is mounted outside the wardrobe at the entry/exit point. All sensor cables terminate inside the panel enclosure: the panel location determines the cable routing for the entire system.
5. Planning Your Door Access and Intercom
Door access control and intercom systems both require physical cabling to the door: power for the lock, data for the reader, video for the door station. Every one of these cable runs is straightforward during a renovation and expensive after.

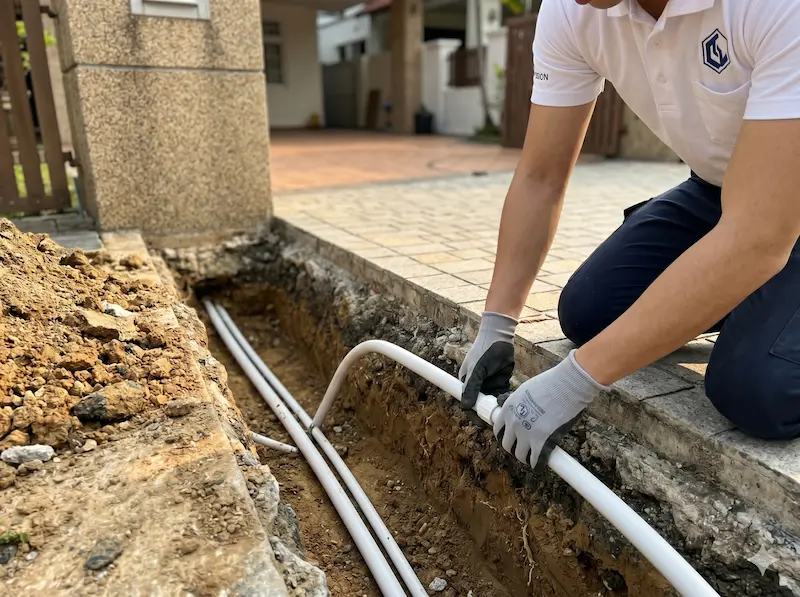
Underground conduit from the gate post to the house: the correct time to lay this is during civil works, before the driveway is paved. Trenching a completed driveway costs S$800–1,500 and disrupts the finished surface.
Gate and Perimeter Cabling
The most commonly missed cable run in Singapore landed home renovations is from the main gate post to the house. This single conduit needs to carry: power for the gate motor, Cat 6 for the intercom door station, Cat 6 for the CCTV camera at the gate, and potentially a second Cat 6 for a card reader. The conduit needs to be buried before the driveway is paved: once the driveway tiles or concrete is laid, trenching it to add a conduit costs S$800–1,500 and leaves a visible repair line across the finished surface.
Door Access: Cable Requirements per Door
| Component | Cable Required | Notes |
|---|---|---|
| Card reader / biometric terminal | Cat 6 from reader to controller | PoE powers the reader: no separate power cable needed |
| EM lock | 2-core power cable from controller to lock | 12V or 24V DC: size wire gauge to lock current draw and cable run length |
| Electric strike | 2-core power cable from controller to strike | Strike is in the door frame: cable must pass through the door frame rebate |
| Door position sensor | 2-core from sensor to controller | Monitors whether door is open or closed: required for anti-passback and held-open alarms |
| Exit button (inside) | 2-core from button to controller | Allows egress without credential: required by fire code on controlled exit doors |
Lock Type Must Be Decided Before Door Frame Installation
Electric strikes are installed in the door frame rebate: the channel that the latch bolt engages with. This requires a specific cutout in the frame. If the door frame is installed without this cutout, adding an electric strike later requires removing the frame or surface-mounting a different lock type. The lock selection decision must be made before the door frame is fabricated and installed: not after the door is hung and painted.
We have been called to multiple completed renovations where the ID selected and installed beautiful aluminium door frames that have no provision for an electric strike and insufficient clearance for an EM lock bracket. The homeowner wanted access control on these doors. The options available after the fact were all compromises: surface-mounted hardware that looks wrong, or drop bolts in the floor that require drilling through new tiles. A 15-minute conversation before the frame was ordered would have specified the correct frame profile at zero additional cost.
6. Planning Your Network Infrastructure
The network is the backbone that every other security system depends on. CCTV cameras, access control readers, intercoms, alarm panels, and Wi-Fi access points all need Cat 6 cabling and switch ports. Planning the network during renovation is both the most cost-effective moment and the most commonly skipped step.
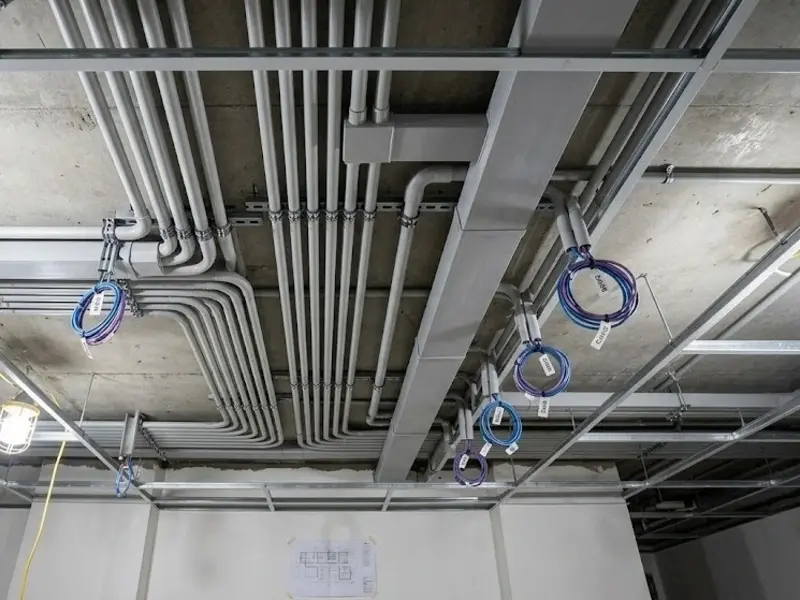
Cat 6 rough-in during renovation: all cable runs for CCTV, access control, Wi-Fi access points, and room network points pulled in a single M&E stage.
This section works in conjunction with our Home Network & Wi-Fi Planning Guide, which covers the network design in detail. From a renovation planning perspective, the key principle is: plan all network cable runs together in a single M&E stage, not system by system.
What to Plan for Each Room
| Location | Cat 6 Runs Needed | Notes |
|---|---|---|
| Living room / TV area | 2 minimum (TV + spare) | Smart TV and media player: wire both. Add a third if you plan a desktop in the living room. |
| Each bedroom | 2 minimum | One for device use, one for a wall-mounted Wi-Fi access point if needed |
| Study / home office | 3 minimum | Desktop, laptop docking, and IP phone or spare |
| Kitchen | 1 | Smart appliances or a kitchen TV: often overlooked |
| Each planned Wi-Fi AP position | 1 per AP | Wired backhaul to the access point eliminates the mesh wireless backhaul penalty |
| Each CCTV camera position | 1 per camera | PoE camera: single Cat 6 carries power and video |
| Each intercom door station | 1 per station | PoE door station: single Cat 6 carries power and data |
| Each access reader position | 1 per reader | PoE reader: single Cat 6 carries power and data |
The Comms Cabinet Location
All Cat 6 cable runs terminate at a central point: the comms cabinet or network rack. This location needs to be planned during renovation so that: the cabinet can be built into carpentry or fitted into a utility space, power is available for the PoE switch and router, ventilation is adequate, and the cable routes from all parts of the house converge here without excessive run lengths. In Singapore landed homes, the utility room, helper's room, or a purpose-built shallow cabinet in a corridor are all common choices. The critical requirement is that all cable runs reach this single point.
The network cabinet is rarely the most exciting part of a renovation. It is also one of the most important. Every security system eventually connects back to this location: the CCTV NVR, the alarm panel, the access control server, the PoE switches, the broadband router. A poorly planned cabinet becomes crowded, difficult to maintain, and impossible to expand without significant disruption. A well-planned cabinet may never be noticed by the homeowner, but it quietly supports every connected system in the property for as long as the building stands.
Plan for the Systems You Have Not Thought of Yet
One of the most common renovation planning mistakes is designing only for today's requirements. A homeowner may know they want CCTV. They may know they want an alarm system. What they often do not know is what they may want five or ten years from now.
Future additions that commonly arise include additional CCTV cameras at positions not originally planned, access control at internal doors, vehicle gate automation, licence plate recognition at the car park entry, extra Wi-Fi access points as devices multiply, smart home automation, energy or solar monitoring, and smart lighting controls. None of these are unusual additions: all of them are significantly easier to accommodate if the conduit and cable infrastructure is already in place.
During renovation, the difference between installing one conduit run and two conduit runs is minimal: a matter of a few dollars in materials and minutes of labour. After the renovation is complete, adding that second conduit means opening a finished wall, patching, and repainting. The difference between pulling six cables and pulling eight cables during the rough-in stage is equally small. After the walls close, those two additional cables may cost hundreds of dollars to add.
Whenever possible, install spare conduit and spare cable runs in every wall void and ceiling cavity that is accessible during the renovation. Most homeowners never regret having them. Many regret not having them.
7. The M&E Schedule: What to Write and Why
The M&E (Mechanical and Electrical) schedule is the document that tells the electrical contractor what to install before walls close. A good M&E schedule for security systems prevents the most common renovation mistakes: and gives you a basis for verifying the work before the walls are sealed.
A proper M&E schedule specifies cable type, conduit size, termination point, and labelling standard for every run: not just "cable for CCTV."
What a Security M&E Schedule Should Specify
A vague instruction like "run cables for CCTV" will be interpreted by the electrician in the way that is easiest for them to execute: not the way that best serves the security system. A proper M&E schedule for security specifies:
- Cable type and specification: "Cat 6 UTP" not just "network cable." "2-core 1.0mm alarm cable" not just "alarm wire."
- Quantity and route: "1 × Cat 6 from master bedroom ceiling to comms cabinet in utility room via ceiling void": not just "1 cable to bedroom."
- Conduit specification: "20mm PVC conduit, all runs, with draw wire left in conduit for future cable addition."
- Termination standard: "All Cat 6 to terminate T568B standard at patch panel. Wall plates to be labelled with room reference code matching patch panel."
- Tail length: "300mm tail protruding from conduit at each device position." Too short a tail means the installer cannot reach the termination point cleanly.
- Spare runs: "1 × spare Cat 6 to each bedroom ceiling, coiled in ceiling void for future use."
Who Writes the Security M&E Schedule
The security integrator writes the security portion of the M&E schedule: not the electrician, not the ID, and not the homeowner. The integrator knows what each system needs, what cable specifications are required, and what the termination standards are. The schedule is then handed to the electrician to execute. Expect the integrator to provide this as part of their pre-renovation consultation: if they will not commit to a written cable schedule before works begin, that is a signal about how they approach documentation generally.
8. Cabling Standards and Conduit
The physical quality of the cabling infrastructure installed during renovation determines the ceiling of performance for every security system connected to it. This is not an area to value-engineer.
Cable Specifications: The Minimums
| System | Minimum Cable Spec | Recommended | Never Use |
|---|---|---|---|
| CCTV (IP cameras) | Cat 6 UTP | Cat 6A for runs over 70m | Cat 5e for new installations |
| Access control readers | Cat 6 UTP | Cat 6 | Shielded cable unless specifically required by reader |
| Intercom door stations | Cat 6 UTP | Cat 6 | Analogue intercom cable for new IP installations |
| Alarm sensors (wired) | 2-core 0.5mm alarm cable | 2-core 0.75mm for longer runs | Telephone cable or speaker wire |
| EM lock power | 2-core 1.0mm minimum | 2-core 1.5mm for runs over 30m | Undersized cable: causes voltage drop and unreliable lock operation |
| Network (general) | Cat 6 UTP | Cat 6A for the whole house if budget allows | Cat 5e for new works, Cat 7 for residential |
Conduit: The Non-Negotiable
Every cable run should be in conduit. Not some runs. Every run. Conduit serves three functions: it protects the cable from physical damage during and after the build, it allows cables to be replaced or supplemented without opening walls, and it provides a clean professional installation that future contractors can understand and work with.
In Singapore's climate, even indoor cable runs benefit from conduit: the humidity and temperature cycling that comes with air-conditioning fluctuations accelerates degradation of cable insulation over 10–15 year periods. A cable in conduit lasts longer than a cable cable-tied to a rafter.
Always leave a draw wire in every conduit run. A draw wire is a thin steel wire or nylon string left inside the conduit after the initial cables are pulled. When you need to add a cable two years later, the draw wire allows you to pull the new cable through without accessing the wall. On a 20-cable renovation, the draw wires add perhaps S$50 in materials and 30 minutes of labour. The cost of not having them when you need them is measured in wall openings.
Termination Standard: T568B Throughout
All Cat 6 cable must be terminated to the T568B wiring standard: at the wall plate, at the patch panel, and at any intermediate connection. T568A and T568B are both functional standards, but mixing them on the same cable run creates a crossover that causes the link to fail. Specify T568B in the M&E schedule and verify compliance before walls are closed. See our Network Planning Guide for a detailed explanation of why this matters.
Post-Installation Documentation
Most renovation discussions focus on equipment, cables and conduit. Very few people think about what should be documented once the installation is complete. Yet documentation is often what determines whether a system remains manageable and easy to maintain ten years later.
A properly documented installation should include as-built drawings showing all device locations and cable routes, a cable schedule matching each cable to its termination points at both ends, network information including IP addresses and switch port assignments, all equipment model numbers and serial numbers, administrator credentials for every system: NVR, alarm panel, access control controller, PoE switches, and router: and warranty records and service contact information.
Without proper documentation, every technician who attends the site must spend time rediscovering information that should already exist. This increases troubleshooting time, increases service costs, and creates unnecessary frustration. The equipment belongs to the homeowner. The information about the equipment should belong to the homeowner as well. A professional installation should deliver both.
9. Common Renovation Security Mistakes: and What They Cost to Fix
Every item on this list is drawn from real jobs where we arrived at a completed renovation to install a security system and found a problem that could have been avoided at zero cost during the build.
Most of these mistakes were not caused by poor workmanship. They were caused by decisions that were never made. Nobody decided where the cameras should go. Nobody decided what lock type would be used at the main entrance. Nobody decided where the network cabinet should be located. When decisions are not made, contractors naturally proceed based on assumptions: routing cables where it is easy, not where it is correct. The resulting installation may still work, but it almost always involves compromises that could have been avoided entirely with thirty minutes of planning at the right time.
| Mistake | How It Happens | Cost to Fix After Renovation |
|---|---|---|
| No conduit to gate post | Driveway paved before security integrator was consulted | S$800–1,500 to trench and repave driveway. Visible repair line remains. |
| No cable to camera positions | Electrician not briefed on camera locations | S$150–300 per run to chase walls and repaint. Multiply by number of cameras. |
| Door frames installed without electric strike cutout | Lock type not decided before frame fabrication | Frame must be modified or replaced, or a compromised surface-mount solution used. |
| No power point at NVR location | NVR location not communicated to electrician | S$120–200 to add a socket point after completion. Cable runs visible if no conduit available. |
| False ceiling obstructing camera field of view | ID not briefed on camera positions before ceiling design | Cut a hole in new false ceiling (visible) or accept compromised coverage. |
| Cables not in conduit | Electrician took shortcuts to save time | Adding cables later requires opening walls. No draw wire means full re-pull. |
| Unlabelled cables | No labelling requirement in the M&E schedule | 2–4 hours of testing on every service visit. Contractor charges for diagnostic time. |
| No comms cabinet planned | Network and security equipment location left undefined | Equipment ends up on an open shelf with trailing cables. No ventilation, no organisation. |
| Undersized EM lock power cable | Electrician used whatever wire was on the reel | Voltage drop causes unreliable lock operation: intermittent faults that are difficult to diagnose. |
| Cat 5e specified instead of Cat 6 | Electrician substituted cheaper cable | Acceptable for current use but limits future performance. Difficult to replace once in walls. |
We attended a GCB renovation where the electrician had run 24 Cat 6 cables to the comms room: none of them labelled, none of them in conduit, and all terminated directly into a switch sitting on an open shelf. The homeowner had spent over S$2 million on the renovation. The network and security infrastructure that their cameras, alarm, and access control depended on was a bundle of unmarked cables and an unprotected switch. We spent two hours testing to identify which cable went where before we could begin the security installation. The correct infrastructure: conduit, patch panel, labelling, a proper rack cabinet: would have added perhaps S$3,000 to the total renovation cost. The diagnostic and remedial work cost more than that.
10. The Pre-Renovation Site Assessment
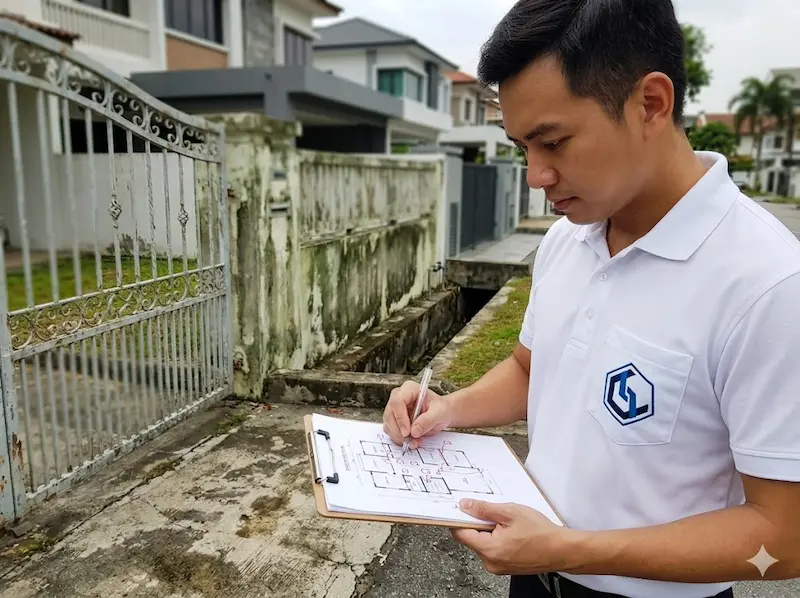
The most valuable thing a security integrator can do for a homeowner planning a renovation is walk the property before the ID finalises the plans: not after the renovation is complete. This is when the conversation costs nothing and changes everything.
A pre-renovation site assessment: the security integrator walks the property with floor plans and marks camera positions, cable routes, and equipment locations before any walls are closed.
What Happens in a Pre-Renovation Assessment
The security integrator walks every part of the property: gate, perimeter, each floor, roof if accessible: with the floor plan open. They identify: all entry and exit points that need to be secured, the optimal positions for cameras given the property's geometry and the owner's priorities, the routing for all cable runs from device positions back to the central equipment location, any architectural constraints that will affect lock selection or equipment placement, and the power supply requirements at each location.
The output is a marked-up floor plan showing all device positions and cable routes, a cable schedule for the M&E contractor, a list of items to specify in the ID brief, and a preliminary equipment specification. This document becomes the basis for the M&E schedule and the eventual security system installation.
What Changes If This Is Done Early vs Late
| Decision | Made Before Plans Finalised | Made After Renovation Complete |
|---|---|---|
| Camera position conflicts with false ceiling | ID adjusts ceiling design: cost: S$0 | Cut hole in new ceiling or accept compromised coverage |
| Gate conduit route | Laid before driveway: cost: S$80–150 | Trench completed driveway: cost: S$800–1,500 |
| NVR cabinet location | Incorporated into carpentry scope: cost: S$200–400 | Standalone cabinet on open shelf or retrofitted into existing joinery |
| Lock type for main door | Correct frame profile specified: cost: S$0 | Compromised surface-mount hardware or frame replacement |
| Spare cable runs | Pulled alongside active cables: cost: S$2–5 per run | Wall opening and repair: cost: S$150–300 per run |
The cheapest time to install infrastructure is before the walls close. The cheapest time to decide on lock types is before the door frames are fabricated. The cheapest time to plan camera positions is before the false ceiling is built. The cheapest time to run a spare conduit is when the electrician is already on site. Most renovation-related security problems are not technology problems. They are timing problems. Good planning solves them before they occur.
One homeowner told us after completing a major landed property renovation: "If I had known then what I know now, I would have spent another S$1,000 on conduit and spare cables." The renovation budget had exceeded S$300,000. Yet the issue that created the most frustration in the years that followed was not the flooring, the carpentry, or the lighting. It was the lack of infrastructure for systems the family later wanted: a camera at the side passage, an access reader at the utility door, a Wi-Fi access point on the second floor. Security systems, home networks, and smart home technologies evolve. Buildings remain for decades. A small investment in infrastructure during renovation often delivers value long after the renovation itself has been forgotten.
Security planning during renovation is not a separate project that happens after the main renovation is designed. It is part of the renovation design. The decisions made during the design phase: camera positions, cable routes, lock types, equipment locations: determine what is possible for the next 15–20 years of that building's life. Made early, these decisions cost nothing and constrain nothing. Made late, they cost money and force compromises. The single most valuable thing any homeowner planning a renovation can do is engage their security integrator before the ID finalises the plans: not after the renovation is complete.